3D Modelling a Revolver - Part 5
- Oct 12, 2020
- 5 min read
As the fifth week of modelling comes to an end, I made more progress with my revolver. I decided to take this day to plan what I would next week more than actually modelling, which is something I needed to do.

I noticed that there was a gap in between the geometry, so I quickly planned out how I would fill this with the grease pencil tool. I decided I would create a pipe and then extrude it downwards to fill in the gaps.


I created a pipe and resized it so that it fit in the with hole for the screw above it, and then deleted the faces I didn't need.


I then extruded the edges downwards, before filling in the edges that I had deleted. I moved it around a little and then squished it inwards to fit better.


I then selected all the edges and bevelled it so that it fit in perfectly with the other models.


I adjusted some of the vertices to fit better with the other models. There was a large gap by the hammer, which I filled with the topmost vertices.


I returned to the under-frame part of the revolver, as I had noticed in the reference image that there was a divot on the inside where the two sides of the metal are connected together. I added an edge loop to the centre, with two other edge loops skirting it.
I then selected all the edges and pulled them inwards. One of the edges was clipping, so I pulled that out as well, before adjusting a few of the vertices in the area. Because of the curve of the geometry, I had to push some of the vertices in further.


Once I was happy with how the vertices were laid out, I bevelled the edge loops. For now, this is the finished model.


Here is how the revolver looks so far into the project.

I planned out some smaller things, like how I would create the screws that attach the revolver together. I decided that I would only modelling the largest model, and then duplicate it over to the other areas.


I quickly created a cylinder and put it in position for later, and I still have a few things I want to model before moving onto the screws.

I also marked out the geometry I made earlier as a placeholder in case I forgot.

The next thing I planned was how I would create the chamber of the revolver. I had three ideas of how I could model it. My initial thought was to only model one part of it, and the rotate and attach it around to the other areas.
Idea 1:
Idea one was to start with a cylinder and cut a hole in it to create the space for a bullet. However, this way will most likely not be successful, as creating a circle from a square in Maya would prove difficult and would be near impossible to get perfect.
Idea 2:
Idea two was to use booleans to cut out a cylinder inside the chamber, which would give me an accurate gap in the geometry. However, this usually results in strange, or even triangular, topology. There's also the issue of me being unfamiliar with how to do this, which may cause some issues later that I won't know how to solve.
Idea 3:
Idea three also isn't ideal, but it's easier than using booleans. I'd use a pipe and then extrude and reshape edges to match a cylinder, which could be made possible by adding subdivision across the top and snapping the vertices to those points.
As far as planning goes, the third idea may be the only one that I can both do and do convincingly. As I don't know many tools in Maya, and am not the strongest 3D modeller, I don't have any other options on what I can do to model the chamber.
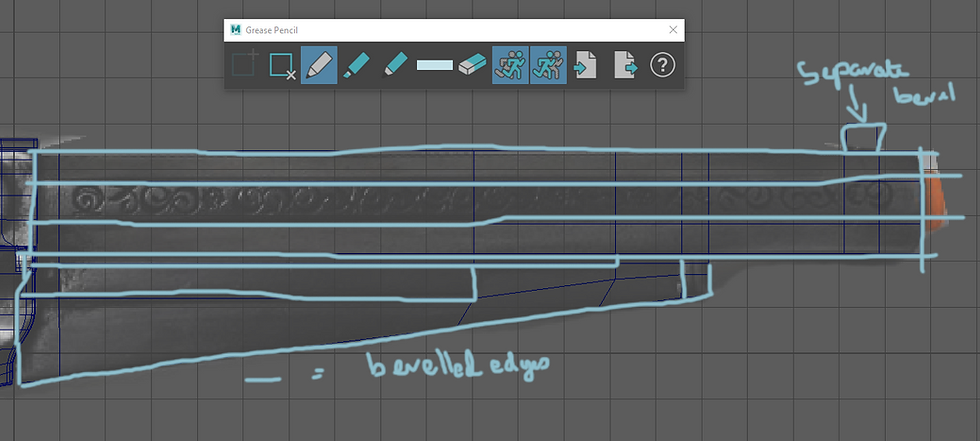
I moved onto planning out the bevels for the barrel. I duplicated the model onto a different layer before drawing with the grease pencil which lines I would bevel. I made sure to be careful this time, as missing one edge meant I had to go back and remodel half the frame before.


Before I bevelled, I needed to create the muzzle of the revolver. Before I could do this, I needed to correct the geometry, so I used the multi-cut tool and merged the vertices to attach them together. I then selected all the vertices in the subdivision I added to the cylinder and expanded them to give myself more room to work with.
I then extruded the faces outwards, making sure to use the reference image to get the thickness correct.


I also had a quick look at the chamber while I was adding an offset to the extrusion. Since a bullet needs to fit through the barrel, it only made sense to offset it with this in mind. I then extruded what I had left in the centre inwards, as the barrel of the gun should be hollow.


I then selected all the edges and bevelled it with two segments like all the other models so far. Because I wanted the muzzle and front sight to have different bevels, I bevelled them separately.
I added an edge loop around the muzzle before bevelling both the edges, which helped to keep the curve it had around the outer edge.


I then went up to the front sight and disbanded the top face to make it less 'blocky' when I bevel its edges. I also bevelled the bottom edges, which gives the illusion that its a separate piece. I bevelled it far less than the rest of the barrel, with only one segment.


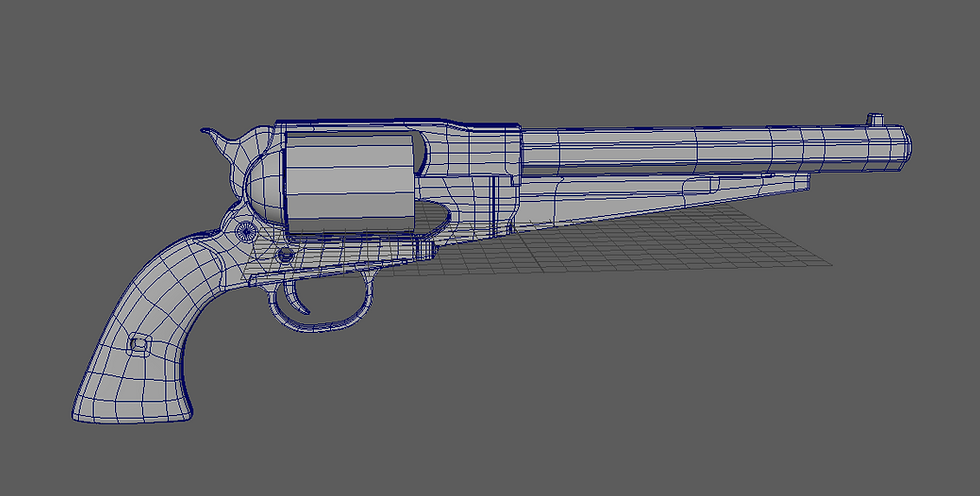
With the barrel bevelled, here's how the revolver is looking so far.

It was at this point that I realised that the barrel was too wide for the frame I had made. By extension, I would need to expand all the other pieces of geometry as well to keep the ratio correct.

In a separate save, I had a go at expanding all the geometry.


Before I did this, I realised that some pieces would need to be joined in order for the revolver to be correct, so I went back to the first model I made and combined both of the metal connectors I had. I then deleted all the geometry between them, selected their edges and bridge them. I later did this again in the original version of this project.

This is how it looks now, which is far more convincing than how I'd left the geometry before. I may still cinched this part in if it isn't too challenging.


I then had a quick go at expanding some of the models outwards, which proved difficult, as I had to do this one by one. Because the cylinder can't be expanded, I had to push the spheres back in on either side to allow space for this.


Here's a quick look at how the model looks with the expanded geometry.
Here is how the revolver looks at the end of the fifth week of modelling. I made a lot of progress this week with modelling, but with less large arts to model, the progress will likely slow and steady from here.


Comments