3D Modelling a Revolver - Part 7
- Nov 30, 2020
- 2 min read
With modelling complete, the next task was to UV the model so that it cane be textured. I decided to UV all the components of the model separately and then bring them together into one cube of the grid. This way, I can think of the aspect ratio each part of the model should have with its individual parts.

I started with the barrel, which I decided to leave as it was, since the Automatic UV had created a good layout for it anyway.


Next I moved onto the frame, which I had to completely redo the UVs for, as it's an incredibly unusual shape. I managed to organise and unfold it, ready to move back into one cube on the graph. I did this by selecting the edges of the geometry and then selecting the 'cut' option, which creates new cuts for UV shells. I also had to 'sew' a lot of the part of the frame back together.


Here's the UVs for the hammer, which I checked with the textured view, which I used to get the aspect ratio right for all the UV shells.


These are the UVs for the handle. This still needs to be edited, as on side of the handle is strangely twisted. This has already been unfolded, so I will most likely need to go in manually and rotate it back into place.


Here are the UVs for the trigger guard, which I also had to edit heavily.


Here's the trigger's UVs, which were an easy task for me to edit.


Next I organised the UVs for the chamber and frame connector, which took a little bit of work, but was straight forward since its a more recognisable shape.


Here are the UVs for the metallic strip inserted in the handle. Since the inner parts of it won't be seen, I sized the UVs down for more space in future.


Next I created the UVs for the chamber. I had difficulties with getting the cylindrical UV option to work, so I had to do it manually instead.


I then moved onto the metal connector, which had a lot of internal components I had to organise.

I made sure to separate most of the UVs as I did them so that I could organise them later. I still had a few I needed to sort, so I went to those next.


I quickly UV'd the screws, leaving the cylindrical parts of them small, since they'll never be seen.


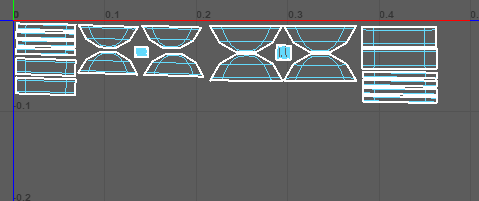
With all the UVs complete, I started arranging them into one cube on the grid. I end up having to resize a few things before I was completely happy with this, and I may still go back and edit this. Since there is still space in the grid, this will be easy.

For now, these are the UVs. I used the textured mode in order to get the ratio of each of the parts correct. This is now ready to be textured in Substance Painter. My next point of call is to finish modelling the tower and start on the door, which are the other two models I hope to complete by the end of this unit.


Comments