3D Modelling a Tower - Part 1
- Nov 25, 2020
- 5 min read
With my reference created for the Tower, I started modelling.


The first thing I did was place the image I created for reference and turned it into an image plain. I made sure to size it up so that I would be able to model in more detail, as well as above the origin.


I decided to start by creating the tower's main body. I started by creating a cube and sizing it up and adding edge loops in line with the windowsill and columns.


With all the subdivisions added, I started intruding and extruding areas of the geometry outwards to create a tower. I also added edge loops in the centre of the top and bottom extrusions so that the geometry could easily be duplicated and joined.


I then started moving around the vertices to create the shape of a window. I then extruded the window inwards to create the window's glass. To ensure I had the same geometry on every side of the tower, I deleted the walls so that I could duplicate and join them together.


I duplicated the geometry and then erased everything but the wall with the window. I then duplicated it and moved them into the correct placing by rotating and holding J to snap to every 16 degrees. I then merged all the vertices together.


I then made some cuts with the multi-cuts on the corners of the tower so that I could make some spikes on the corners. After bridging the gaps, I selected the upper corners and offset and extruded them outwards.


With the tower completed for now, I decided to work on the roofs. I started by making a cone, and adding 20 subdivisions so that I could extrude them out. I also rotated so that there was a face facing forwards.


I then selected four columns of subdivisions on the sides and extruded them outwards. I then selected some of the faces on the extruded section and extruded them outwards once more to create spikes on the spire. These will need more tweaking later.
I then selected the bottom faces and deleted them so that I could extrude them outwards and then down and bridge them back together. To this, I also added some spikes.


I then moved onto the dome roof below it. I created a sphere with 20 subdivisions, and rotated it the same as the spire roof, and then deleted the bottom of the sphere and squashed it down slightly.
I then added extrusions and spikes like I had for the spire, and extruded the bottom out and down as well.


I now decided to work on the top of the tower, where the window will be. I started by making a cube and added 5 subdivisions to all the sides. I tried adding edge loops to create the cuts for the sides of the window.
Instead, I decided to use the multi-cut and holding shift to make a vertex in the centre of an edge and creating diagonal lines on the four corners. I then extruded these faces up after making the geometry simpler. I made sure there was a ridge around the window to give it more definition.
I then used the multi-cut tool one last time to cut the corners of the cube and extruded them inwards like I had drawn them in the design.


I then went back to the tower and deleted the tops and bottoms and duplicated them on top of each other and combined and merged them.


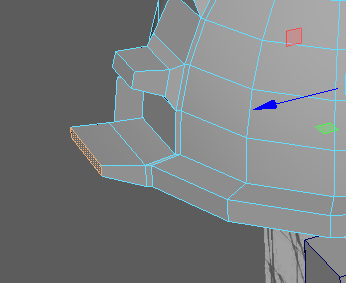
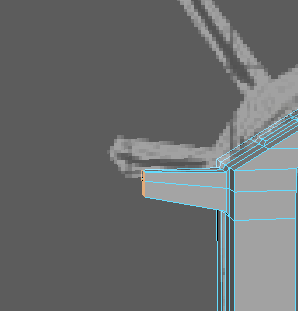
I then moved onto creating the buttresses for all the levels of the tower, which I'd wanted to add after seeing the Ypres and Reim Cathedrals. I used a cube to get the main shape of it correct before extruding it outwards and connecting it into the wall. This was the hardest flying buttress to make, as it's at a diagonal angle, whereas the rest of them are straight.
I then added edge loops and extruded some of the sections outwards to create spikes to match the roofs. The spikes became a theme in the design when I was drawing it, so I decided that this would be the motif of the tower.
I had to thin them down in places because the extrusion caused them to puff out.


Once I was happy with the extrusions, I added one last one to the top of the buttress to 'bevel' it. Then, in an isolated top-down view, I moved the pivot point of the buttress into the origin, and then duplicated it around in a circle.


Next, I moved onto creating the larger buttress, which will be duplicated later as well. This was far easier to create than the first because it wasn't at an angle. I then added the edge loops along the top and bottom, as well as extruded a part of it out from below to meet the wall, which matches the real-life elegance of some flying buttresses.
The final thing I did was create the spikes with extrusions and offsets, which I did in two separate extrusions and then altered. I then used this buttress and shrunk it down to create the final layer of buttresses, which saved me a lot of time.


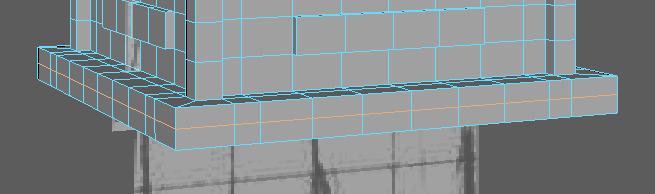
In the design, the segments nearer the base become larger, which meant I had to create these individually. I started on the uppermost layer of this, and started creating a castle-esque wall, which brought about a 'Hyrule Castle' appearance. This hadn't been something I'd originally noticed or planned, but I like to comparison, since both structures are from fantasy worlds.
I added more edges loops to the geometry and then extruded sections of it up to become stone walls of a fortress. I added an extrusion to the bottom of it to match with how the buttresses had been positioned, and also added some extrusions around the castle walls I had created, which I plan to add engravings to with normal maps.


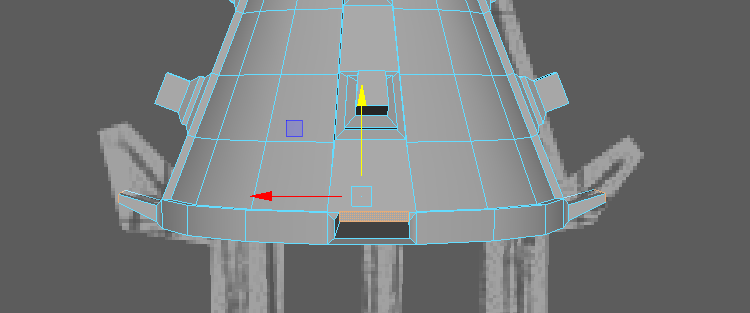
Going back to the roofs, I decided it was time to link them together. I originally tried to erase and fill the top of the roof so that I could extrude it upwards, but this didn't work. So instead I just extruded it as it was and added cubes to act as columns to hold the spire up.


I then went back down to the bottom of the tower and create a base layer and added subdivisions to it, before adding another two on top in preparation to create them as well. I went to the uppermost cube I made and started creating a wall like on the level above. Using edge loops and extrusions, I managed to create the same effect as the level above, and even added the gaps for more ancient incsriptions.


I quickly duplicated and rotated the smaller buttress into the correct positions, which frames the tower nicely, and will make it easier to place windows and decorated when that's needed.


The final thing I did was create a window and sill much like how the tower above had been created. I duplicated the geometry to all the other sides before combining and merging them together, which completes the top layer of the fortress beneath the tower.
In the coming week, I hope to complete modelling and move onto UVing, since modelling a tower is significantly easier than modelling a revolver. There is also the door model to think about, which is something I hope to design in the same style as the tower.


Comments