Robot - Animation and Rendering
- jesskesson
- Jun 14, 2019
- 6 min read

I started animating my robot in Maya. It was the first time I'd ever done an animation in Maya, so I had a few attempts that didn't look right or work. However it ended well in the end, and I'm happy with how my animation turned out.
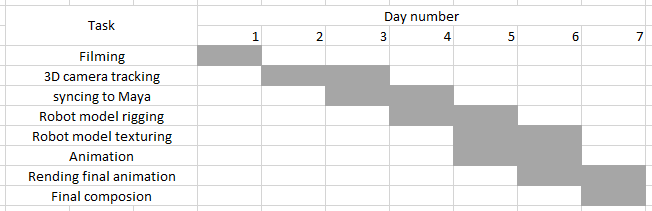


Above is my Gant Chart and Risk Assessment. the point of a Gant Chart is to plan out the time frame that you need to work to. Although mine isn't accurate, this would be the time frame I'd work to if I could do this project again. A Risk Assessment is an analysis of all the possible injuries that could take place during the filming. I could only think of a few, as the filming was in NESCOT. I also didn't think any extra precautions would be needed for either of these risks.
I started by loading in my robot model as a refence, along with a keyboard, computer monitor and mouse model from Weblearn. I sized these all up to the correct size, and then sized my robot down as well to fit the scale.
It was a lot of fun to position my robot on the chair, as I had a fun time getting the arms in a good position to type. Because of the inflexible joints of my robot, I had the rotate the arms at some odd angles to get it to look right.

So I started animating. I had the plan that my robot would start typing, then get frustrated and hit the keyboard a few times before punching the monitor. My first attempt of this was horrendous, and the arms would move in strange directions and clip through each other.
This was at a point in time when I didn't fully understand how adding frames worked in Maya. So I deleted all the frames apart from the first ones and started again, this time deciding to emphasise the punch at the end.


I started by animating the arms up and down to create the illusion of typing. It was easy for me to do this, as when I'd created my rigs, the arms would move in opposite directions up and down. So it was a quick process to animate the typing.
In my first attempt, I tried to animate the forearms to react to the typing, but I found that I made the arms clip through each other as rotating them up or down moved them closer together.
I had the same problem with this when I was raising the arms up to smash them down onto the keyboard. They would completely clip through each other, so on the next take of it, I made sure the arms lined up vertically and didn't move to the sides when the animation went on.


After the keyboard smashing is the punch. I put in a few keyframes, and watched the result. Although it wasn't smooth, I loved how the robot spins the arm while the other one punches. I thought it made the whole thing look more mechanical.
I ended up having to tweak it, as the arm would appear to clip through the table. It still looks awesome in my opinion. I also had fun animating the monitor. I moved it so that it flies back into the wall and then falls over. It was the easiest part to animate. I moved the pivot point to the front and then rotated it down. It looks convincing, but if I could do this animation again, that would be one of the first things I would change because it moves a little too slowly.

The next thing to do was add the textures to my model. I had a lot of trouble with this, as the textures wouldn't export on the same image files. I tried to fix this problem by myself, but eventually had to get help.
What I would have had to do was go into photoshop with the files and combine them all into the same images. This worked, and they would render correctly in Maya when I next put them in.
I assigned a more realistic texture for rendering before putting in my textures. They turned out looking great. If I were to do the textures again I would definitely add more colour, as the final composition now looks a little dull.


After that I got to rendering. I started with trying to render a lot of other models to hide the fact that when the robot punches the monitor back, it doesn't look right because of the monitor next to it. So I tried to add in another monitor model, but to do this I had to add in a bunch of unnecessary geometry.
I decided later on to get rid of this, but for a while I kept it around. I tested out some renders with all of it, and it appeared fine. The textures on the monitor wouldn't work for me, and I didn't have time to go and texture them myself. So I just left it. Later on, I had some help to correct the front, but because of the animation the back is visible.

I also added a skyDome to the animation, and added the panorama to give a better idea of how the lighting should be. This really helped when adding the shadows. In one of the renders the background came out red. To fix this, I had to duplicate the original camera and then delete it. By changing the render perspective to the new camera, the problem was fixed.


Then I went in and looked at the shadows. I had added in a ground plain, and assigned the ShadowMatte material to it to give it a shadow. I also went into the settings and made sure the desk and computer tower wouldn't be visible while rendering, as well as the ground plain.
This will make it so that the only thing that will be rendered out will be the actually frames.
Then I started rendering. It took nearly three hours, but it get done in good time. Unfortunately, at first I couldn't find the TIF image files for all the frames, as I hadn't specified a location for them to render to. I managed to find them eventually, and copied them all over to my renders file in my project.

The next thing to do was open After Effects and load in my undistorted camera plate I'd created a few weeks ago in NukeX. Then I went into the file menu, and imported all the TIF files that had rendered. The first time I did this, I forgot to tick that the TIFs were in a sequence, so they all imported in as separate files.
Once they were in there was a new problem. Frame 23 hadn't rendered properly, so I had to delete it and import the composition again, this time with a copied frame 22 that I renamed to keep the order.
I made sure the frame rate matched up, changing the TIFs frame rate from 30 to 25. When an image sequence is imported in, After Effects assumes that the frame rate is 30, so it's an automatic setting.


All I had to do now was adjust the settings to make the composition fit better. The exposure was a little off, so I changed that first. I changed it to 0.4, as it matched the footage the closest.
The second part of correcting it was to adjust the shading. I decided to make the shadows a little darker because the shadows in the original film were a bit more extreme because of the lighting. I brought the highlights up as well, but turned the mid-tones down to keep a balance.
Then I added a blur to the robot because it stood out too much as CGI. Overall, I think this helped the composition come together and look more believable.
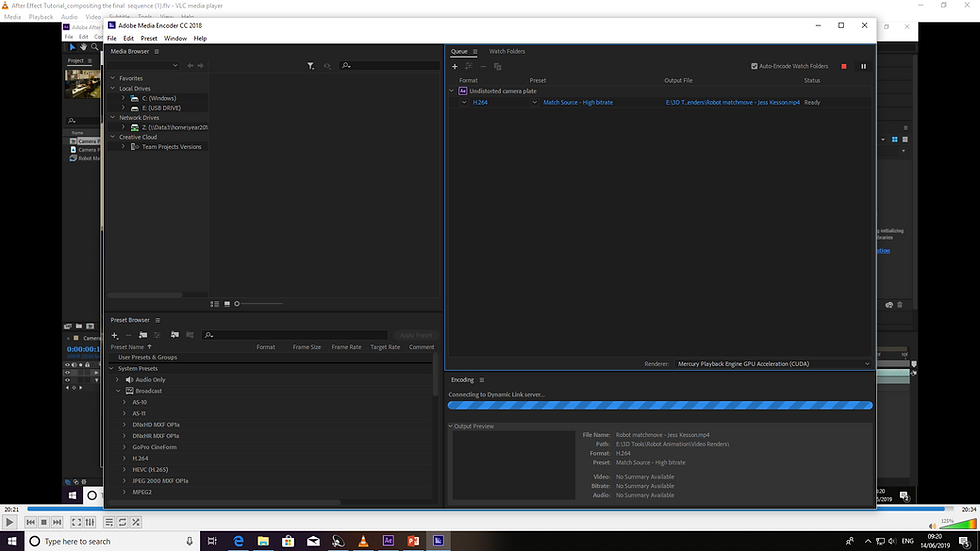
All that was left to do now was render it out in Adobe Media Encoder. This didn't take nearly as long as the rendering in Maya did, so I got to see the finished movie in under a minute.
This is it below:
Overall, I think I could've done better in this project. Animation is not my strong point and neither is modelling, so this was very challenging for me. The concept and planning phase was where I felt more comfortable, as I don't have a lot of practical skills in 3D software. However, I think I did well on the planning phase, as I drew myself blueprints to work from while I modelled. I even tested out different animation timings on paper, and had fun deciding when the robot would punch the computer screen.
If I could do this project again, I would definitely try and add normal maps to my texture. I would like to try and create a robot with a different affect, as my robot was meant to look futuristic and pristine (no battle-damage or rusting). Another thing I would do again is reanimate the sequence. As I was new to Maya animation when I started this, I think the animation would look different if I were to do it again. The timing and movement would be sharper and more exaggerated, and maybe the arms would move a little more.
But I am proud of myself for completing this project, and would do it again to improve my skills.


Comments