Little Shop of Horrors - Sculptress Workshop
- Sep 23, 2021
- 5 min read
Part of our VFX project this year is to create a nightmarish plant to track into a pan of a greenhouse. We will each be individually creating our own models instead of working together for this task, so it was important that we all learned how to sculpt.
This is important because modelling something organic is far different than modelling something manufactured. Last year, I created a door, revolver and a tower in Maya, which is a brilliant software for creating sharp shapes. However, to create something smoother like a plant, a sculpting software like Mudbox would be better. I already have a small bit of experience in Mudbox from last year, which helped me a lot in this quick workshop.

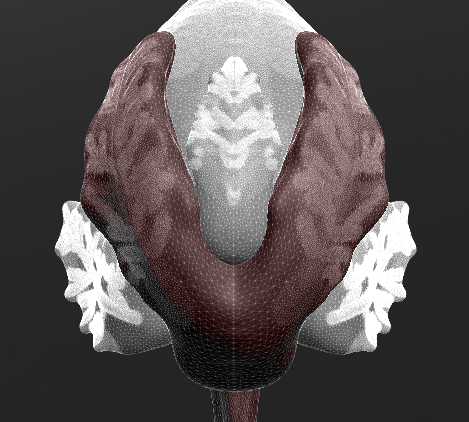
This workshop took place in Sculptress, which is a simple-to-use sculpting programme made by the creators of ZBrush, which also gives the user sculpting tools. To give ourselves a quick crash-test in sculpting, we were instructed to select an image to use as reference of the carnivorous plant from The Little Shop of Horrors, which is a good inspiration for this project.
The image I selected is above. Since I wanted this reference image to always be in sight, I used the Stay On Top software to keep the image tab in the corner at all times.

When loading up Sculptress, the first thing I start with is a sphere, which is the base shape of the software. More spheres can be added later if I want multiple components.


I started by using the pull and inflate tools to elongate the front of the sphere to become more egg shaped. I tried to mimic the shape of the mouth by inverting and sizing down the inflate tool, which allowed me to indent the surface. I also used the draw and pinch tools on the lips to sharpen them up. This was all made easy by the fact that everything I was doing was mirrored to the other side, which is how Sculptress operates by default. This setting can be turned off, but it worked in my favour so I left it on.
I can also turn on the view of the wireframe, which has unfortunately been done in tris (triangles), which would mean taking this into another software like Mudbox or Maya could be a bit difficult.


I also used the grab tool to pull the upper lip upwards to give it the same curve seen in the reference image. Once I was happy with the basic shape, I decided to experiment with adding more detail to the head to try and mimic the texture seen in the reference image.
When I tried this at first, it looked too bumpy, so I decided to subdivide the entire thing and then use the draw tool (inverted) to draw lines down the top and bottom of the plant. I then compressed these lines with the pinch tool and then inflated the sections in between each of the ridges to make it look a little bit rougher and more organic.


At this point in time, I was happy with what I'd done. It looks a little like a whale from beneath, but the mouth of the plant may have taken some inspiration from that animal in the first place.


Since I still had a lot of time left to play around with the software, I decided to push myself to create more of the plant. I decided to try and create the stem of the plant, which I did by adding another sphere to work with.
I elongated and then thinned out the sphere into a stem with the grab and inflate tools. I then went back in with the smooth tool at 100% opacity and really thinned it out. As a final touch, I used the inverted draw tool to create crevices in the stem, which makes it look a lot like a spring onion or a stick of celery. Since these are both roots, the comparison is good. Since the plant is organic, then basing it around other plants in different ways is a good strategy.


As another challenge I decided to try and add some of the foliage to the plant. Instead of adding a new sphere in to work from, I decided to try and form the leaves from the head. I used the inflate tool to create some mounds for me to expand into leaves. I used the grab and inflate tools a lot to help me do this.
I had to be careful to not alter the head, but this did end up happening in a few places beneath the leaves. Once I was happy with the positioning of the leaves, I focused on the top leaf. I gave it more of a wavy shape with the inflate and draw tools, and then used the flatten and smooth tools to level it back down.
Using the draw tool once more, I drew on the details of the leaf at different sizes and strengths, before using the smoothing tool at the top of the leaf to make it look more natural. I then repeated this process with the side leaf, which I only had to create once thanks to the mirrored geometry.


As a final touch, I decided to add in another sphere to work with in order to create one last set of leaves to frame the plant's head. I used the inflate, flatten and pinch tools to try and get the shape right, although I had a lot of the trouble with this because there wasn't a way to make the other components invisible whilst I worked on it. Because of this, these leaves are incredibly thick and unconvincing.
However, I still did my best to decorate them. If I took these models into another programme like ZBrush, which is owned by Pixology along with Sculptress, then I could fix this issue.


Here is a final wireframe of the model I created. Given that this is my first time using this sculpting software, I'm proud of what I created. There are many issues with what I made given the limits of the software, but this workshop has given me a taste of what to expect from other programmes. It also showed me what I'm good at, and also had me improvising and testing out different tools and methods of working.
This project will also have me tracking a 3D model into a shot, which is something that I haven't done in a few years, so I will need to completely relearn this. This project will give me a lot of information on modelling, texturing and tracking, which is something that is key to the VFX Industry. Although the Games Industry is my main focus, I am looking forward to tackling this project.


Comments